HTTP and Server-Side Endpoints
Instructor-Only
Section titled “Instructor-Only”
Estimated walkthrough time (with discussion): ?? minutes
Instructor-Only
Section titled “Instructor-Only”Estimated walkthrough time (with discussion): ?? minutes
Estimated walkthrough time (with discussion): ?? minutes
⚠️ Be mindful of delivery time; this walkthrough can easily run long if discussion expands.
Rationale:
Section titled “Rationale:”- Lecture: 30-40 minutes
- Demo Walkthrough: 50-65 minutes
⚠️ Be mindful of delivery time; this walkthrough can easily run long if discussion expands.
- This lesson is longer than lesson 02 and introduces backend/API workflow concepts.
- Students type through REST Client setup, project setup,
db.json, browser GET tests, REST Client requests, status codes, and server shutdown. - The walkthrough needs time for terminal/server state, ports, request methods, and response interpretation.
- The estimate allows extra time for setup friction and troubleshooting local endpoint requests.
Lecture
Section titled “Lecture”This lesson gives students a local API they can control before they start writing fetch() calls in the next lesson. The goal is to understand what an endpoint is, how a REST-style API organizes data, and how request methods change what happens on the server.
Useful Acronyms
Section titled “Useful Acronyms”- HTTP: HyperText Transfer Protocol
- API: Application Programming Interface
- REST: Representational State Transfer
- JSON: JavaScript Object Notation
- URL: Uniform Resource Locator
- URI: Uniform Resource Identifier
JSON and JavaScript Object Literals
Section titled “JSON and JavaScript Object Literals”JSON looks a lot like JavaScript object literal syntax, but it is a data format, not JavaScript code. That matters because API responses and db.json files need to be valid JSON before JavaScript can work with them.
Key JSON characteristics:
- Data is stored as name/value pairs.
- Property names must use double quotes.
- String values must use double quotes.
- JSON supports objects, arrays, strings, numbers, booleans, and
null. - JSON does not allow comments, trailing commas, functions, variables, or expressions.
Compare these two examples:
const body = { name: "Earth", category: "planet", orbitalPeriod: `${365.25} Earth days`,};{ "name": "Earth", "category": "planet", "orbitalPeriod": "365.25 Earth days"}The JavaScript object literal belongs inside a .js file and can use JavaScript features. The JSON example belongs in a .json file or an API response and must stay plain data.
An endpoint is a URL that acts as an exchange point for data. A front-end application can request data from an endpoint, send new data to an endpoint, update existing data, or delete data.
Localhost and Ports
Section titled “Localhost and Ports”JSON Server runs on the student’s computer. The hostname localhost points back to that same computer, and the port identifies which local server should receive the request.
For this lesson, the API server runs at:
http://localhost:3000The bodies resource is available at:
http://localhost:3000/bodiesREST and Data Operations
Section titled “REST and Data Operations”REST-style APIs commonly map HTTP methods to data operations:
| Method | Common Use | Example |
|---|---|---|
| GET | Read data | Get all bodies |
| POST | Add data | Create a new body |
| PUT | Replace data | Replace one body |
| PATCH | Edit data | Update one field |
| DELETE | Delete data | Remove one body |
Demo Walkthrough
Section titled “Demo Walkthrough”This demo uses JSON Server to turn a local db.json file into REST-style endpoints. Students will test the endpoints in the browser, inspect browser requests in DevTools, and send non-GET requests with the REST Client extension for VS Code.
Starter Files
Section titled “Starter Files”Directorydemo
Directory.vscode
- extensions.json
Directoryassets
- send-request.png
Directorypublic
- ceres.jpg
- earth.jpg
- eris.jpg
- haumea.jpg
- jupiter.jpg
- makemake.jpg
- mars.jpg
- mercury.jpg
- neptune.jpg
- pluto.jpg
- saturn.jpg
- sun.jpg
- uranus.jpg
- venus.jpg
- db.json
- package.json
- ReadMe.md
- requests.http
Install the REST Client Extension
Section titled “Install the REST Client Extension”Students should install the VS Code REST Client extension before working with requests.http:
https://marketplace.visualstudio.com/items?itemName=humao.rest-clientVS Code will also recommend the extension from .vscode/extensions.json when students open the demo folder.
Project Setup
Section titled “Project Setup”-
Open the
~/inclass/18/demofolder in VS Code. -
Install the project dependencies.
Terminal pnpm install -
Install JSON Server as a development dependency if it is not already listed.
Terminal pnpm add -D -E json-server@1.0.0-beta.15 -
Add the API server script to
package.json.package.json "scripts": {"api-server": "json-server --watch db.json --port 3000","test": "echo \"Error: no test specified\" && exit 1"}, -
Start the local API server.
Terminal pnpm run api-serverThe terminal should show JSON Server routes for the
bodiesresource.VS Code Terminal JSON Server started on PORT :3000Press CTRL-C to stopWatching db.json...(˶ᵔ ᵕ ᵔ˶)Index:http://localhost:3000/Static files:Serving ./public directory if it existsEndpoints:http://localhost:3000/bodies
Review the Database File
Section titled “Review the Database File”The starter db.json uses one bodies collection. JSON Server turns that collection into endpoints.
The file already contains a static local snapshot based on NASA/JPL-style facts for the Sun, most planets, and the currently recognized dwarf planets. Each object also includes an image filename for a same-size thumbnail in the public folder.1 Earth is intentionally missing so students can add one complete object without spending the lesson typing a long dataset.
{ "bodies": [ { "id": "1", "name": "Sun", "category": "star", "image": "sun.jpg", "description": "The star at the center of our solar system.", "nameOrigin": "Comes from Old English words for the Sun.", "mass": "1.989 x 10^30 kg", "radius": "695,700 km", "orbitalPeriod": "Not applicable", "discoveryDate": "Known since antiquity" }, { "id": "2", "name": "Mercury", "category": "planet", "image": "mercury.jpg", "description": "The smallest planet and the closest planet to the Sun.", "nameOrigin": "Named for the swift Roman messenger god.", "mass": "3.301 x 10^23 kg", "radius": "2,440 km", "orbitalPeriod": "88 Earth days", "discoveryDate": "Known since antiquity" }, { "id": "3", "name": "Venus", "category": "planet", "image": "venus.jpg", "description": "A rocky planet with a thick atmosphere and extremely hot surface.", "nameOrigin": "Named for the Roman goddess of love and beauty.", "mass": "4.867 x 10^24 kg", "radius": "6,052 km", "orbitalPeriod": "224.7 Earth days", "discoveryDate": "Known since antiquity" } ]}Point out that the real starter file contains more objects than this excerpt. The important pattern is that bodies is an array and each body is one JSON object inside that array.
Test GET Requests in the Browser
Section titled “Test GET Requests in the Browser”The browser sends a GET request when students visit a URL.
-
Open the all-bodies endpoint in the browser.
http://localhost:3000/bodies -
Open the single-body endpoint in the browser.
http://localhost:3000/bodies/1 -
Open DevTools and switch to the Network tab.
-
Reload the endpoint page.
-
Inspect the request method, URL, response status, response headers, and JSON response body.
Test Requests with REST Client
Section titled “Test Requests with REST Client”Use requests.http for methods the browser address bar cannot send directly.
The extension adds a Send Request command above each request block:
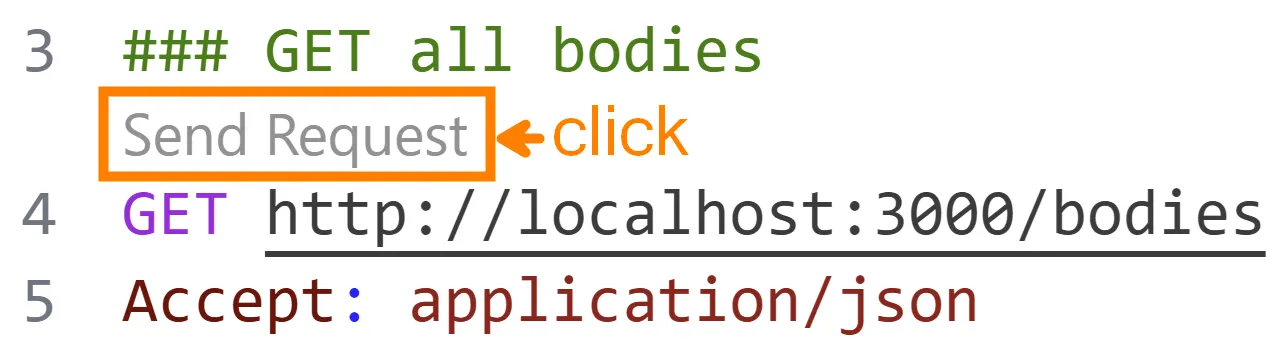
-
Open
requests.http. -
Send the GET all-bodies request.
requests.http ### GET all bodiesGET http://localhost:3000/bodiesAccept: application/json -
Send a PATCH request to update part of a body.
requests.http ### PATCH update a bodyPATCH http://localhost:3000/bodies/2Content-Type: application/json{"description": "The smallest planet, the closest planet to the Sun, and the fastest planet in its orbit."} -
Send a POST request to create a new body.
requests.http ### POST new bodyPOST http://localhost:3000/bodiesContent-Type: application/json{"name": "Proxima Centauri","category": "star","image": "sun.jpg","description": "The closest known star to the Sun.","nameOrigin": "The name means nearest star of Centaurus.","mass": "About 2.43 x 10^29 kg","radius": "107,000 km","orbitalPeriod": "Not applicable","discoveryDate": "1915"} -
Send a GET request to find the newly added celestial body.
requests.http ### GET Earth's dataGET http://localhost:3000/bodies?name:eq=Proxima%20CentauriAccept: application/jsonNotice that the ID for this new star is not a simple “increment” of the last body’s id. The server doesn’t “assume” it can do this. Instead, it tries to make an id that should be unique.
-
Send a DELETE request to remove a body. Replace the
[id-of-proxima-centauri]with the id of the star we added.requests.http ### DELETE a bodyDELETE http://localhost:3000/bodies/[id-of-proxima-centauri] -
Re-send the GET all-bodies request and compare the result with
db.json.
The REST Client response pane shows the status code, response headers, and response body. JSON Server also updates db.json, which makes the file a useful way to confirm that POST, PATCH, PUT, and DELETE requests changed the server-side data.
Add Earth to the Database File
Section titled “Add Earth to the Database File”Have students add Earth after the Venus object in the bodies array. This is the only planned manual data-entry moment for the demo.
-
Manually edit the
db.jsonto include information for Earth. Place it in the “right” spot of the JSON file.Earth object for db.json {"id": "4","name": "Earth","category": "planet","image": "earth.jpg","description": "Our home planet and the only known world with life.","nameOrigin": "Comes from Old English and Germanic words for ground or soil.","mass": "5.972 x 10^24 kg","radius": "6,371 km","orbitalPeriod": "365.25 Earth days","discoveryDate": "Known since antiquity"},After students save the file, remind them that commas separate objects in an array. If JSON Server reports a parse error, check the comma before or after the new Earth object first.
-
Go back to the
requests.httpfile and add a query for Earth.requests.http ### GET Earth's dataGET http://localhost:3000/bodies?name:eq=EarthAccept: application/json -
Include a GET request for Earth’s image.
requests.http ### GET Earth's ImageGET http://localhost:3000/earth.jpgAccept: application/json
HTTP Status Codes
Section titled “HTTP Status Codes”| Code | Meaning | Common Demo Moment |
|---|---|---|
| 200 | OK | Successful GET, PUT, PATCH, or DELETE |
| 201 | Created | Successful POST |
| 400 | Bad Request | Broken JSON body |
| 404 | Not Found | Resource or id does not exist |
| 500 | Server Error | JSON Server problem |
Shutdown the Server
Section titled “Shutdown the Server”-
Return to the terminal running JSON Server.
-
Press Ctrl + C.
-
Confirm the terminal prompt returns.
Conclusion
Section titled “Conclusion”Assigned homework: Complete Homework: Practice REST Requests. It reinforces today’s endpoint workflow and gives fallback practice for REST Client requests, non-GET methods, and status-code interpretation.
Students should finish this lesson with a working mental model of a front end talking to a server-side API. JSON Server is only a simulation, but the request methods, URLs, status codes, JSON bodies, and response inspection habits transfer directly to real APIs.
The next step is to let JavaScript send these requests from the browser. That is where this endpoint work connects to the Fetch API.
Footnotes
Section titled “Footnotes”-
Data values are adapted from JPL/NASA public sources. Thumbnail images are local 240px versions of NASA/JPL Photojournal and NASA mission image releases. ↩